D365FO - Data integration by OData
There are many ways to integrate with D365F&O OData is one of them. This post show you how to do simple integration.
Simple architecture of OData with 3rd party application

There are 3 main steps:
- Create a table, data entity, and OData service endpoint
- Register and prepare (OData client) application authentication in AAD and D365FO
- Create OData client application
Create a table, data entity, and OData service endpoint
First, we create a sample 'MyCar' table.
CarID, BrandName, SerieName and Color declared as string, Price as real, and PurchasedDate as date. Then create an index for CarID and set that index to be table's Primary Index.

Then create a data entity. After finished creating, note some data entities, tables, and security privileges are added into project.


Now, re-check what we've just created.
Table
OData
Register and prepare (OData client) application authentication
in AAD and D365FO
Why we need this?
We need this step because we are going to create an OData client app (the new app) and it cannot run alone. Actually It will run in the same environment with Azure Acitve Directory (AAD) and D365FO which the authentication mechanism provide by OAuth2.0 standard.
This step will make AAD to recognize the new app, provide the necessary App ID and key. Then we use that app ID and key to seam the new app and D365FO together. So when testing, we only need to put the credential once (single sign-on).
It consists of these operations:
- Register a new app in AAD
- Add API permissions
- White-list the new app in D365FO
Register a new app in AAD
Access Azure portal (https://portal.azure.com) with your account for example xyz@yourCompany.onmicrosoft.com
At the left pane, go to "Azure Active Directory" -> "App registrations" and click "New registration"

Then put the name and URI of the app. In this example, I choose public client/native because the new App will be written as console application.

Now, we got app ID, directory ID, and object ID. These ID will be used further.

Add API permissions
 |
| Add caption |


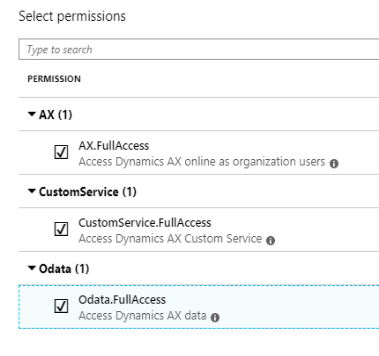
We should get the result like this.

White-list the new app in D365FO
Now, we can bring the new created app ID register in D365FO.
Go to System administration -> Setup -> Azure Active Directory applications


 using System;
 using System.Collections.Generic;
 using System.Linq;
 using System.Text;
 using System.Threading.Tasks;
 namespace AuthenticationUtility
 {
   public partial class ClientConfiguration
   {
     public static ClientConfiguration Default
     {
       get
       {
         return ClientConfiguration.OneBox;
       }
     }
     public static ClientConfiguration OneBox = new ClientConfiguration()
     {
       UriString         = "https://usnconeboxax1aos.cloud.onebox.dynamics.com/",
       ActiveDirectoryResource  = "https://usnconeboxax1aos.cloud.onebox.dynamics.com",
       ActiveDirectoryTenant   = "https://login.windows.net/*****.onmicrosoft.com",
       ActiveDirectoryClientAppId = "*****",
     };
     public string UriString { get; set; }
     public string ActiveDirectoryResource { get; set; }
     public String ActiveDirectoryTenant { get; set; }
     public String ActiveDirectoryClientAppId { get; set; }
   }
 }
Next, add a 'OAuthHelper' class into the project with the following code.
Here we use the URI which already registered in AAD the previous blog.
usingMicrosoft.IdentityModel.Clients.ActiveDirectory; using System; using System.Collections.Generic; using System.Linq; using System.Text; using System.Threading.Tasks; namespace AuthenticaitionUtility { public class OAuthHelper { /// <summary> /// The header to use for OAuth. /// </summary> public const string OAuthHeader = "Authorization"; /// <summary> /// retrieves an authentication header from the service. /// </summary> /// <returns>the authentication header for the Web API call.</returns> public static string GetAuthenticationHeader(bool useWebAppAuthentication = false) { string aadTenant = ClientConfiguration.Default.ActiveDirectoryTenant; string aadClientAppId = ClientConfiguration.Default.ActiveDirectoryClientAppId; string aadResource = ClientConfiguration.Default.ActiveDirectoryResource; AuthenticationResult authenticationResult; var authenticationContext = new AuthenticationContext(aadTenant, TokenCache.DefaultShared); authenticationResult = authenticationContext.AcquireTokenAsync(aadResource, aadClientAppId, new Uri("https://MyCar"), new PlatformParameters(PromptBehavior.Auto)).Result; // Create and get JWT token return authenticationResult.CreateAuthorizationHeader(); } } }
After all, build the project. We should get the good result with AuthenticationUtitlity.dll which will be used by OData client in the further step.

So now, it's time to create ODataUtility.
Why we need this?
This utility will help us to generate all exposed OData service endpoints in D365FO (including one we created before) to be the proxy classes. Then we can connect to those D365FO data entities easily by C# code.
Why we need this?
This utility will help us to generate all exposed OData service endpoints in D365FO (including one we created before) to be the proxy classes. Then we can connect to those D365FO data entities easily by C# code.
Create ODataUtility
First, we create a C# console application project. Name it as 'ODataUtility'.

Next, use 'Manage NuGet Packages...' to add the following reference.
- Microsoft.IdentityModel.Clients.ActiveDirectory
- Microsoft.OData.Client

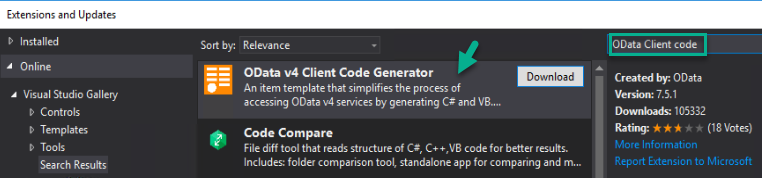
Then, at Visual Studio go to Tools -> Extensions and Updates and search by 'OData Client code'.

Download and install 'OData v4 Client Code Generator'.
Next, add a 'ODataClient.tt' OData Client into the project.

You can click here OK or Cancel. If click ok, it means the first time it generates without the MetadataDocumentUri. The result will be the same eventually.

Then we put this value https://yourboxmainurl/data/$metadata to the MetadataDocumentUri
Before

After

Then, save ODataClient.tt file, and now it's time to click OK and generate the template (proxy classes).

The new created template is ODataClient.cs with around 70 MB file size.

So, the last step is to build the project.
Actually, we should get it finish here, however there are some bug from OData V4 client code generator including the problem that the current version of Visual studio in OneBox machine is VS 2015 which cannot handle such a huge file like ODataClient.cs.
So, when we build the project, we get the error message as follows.
Error CS8103 Combined length of user strings used by the program exceeds allowed limit. Try to decrease use of string literals.


https://github.com/OData/odata.net/issues/1220 His method works and very useful!
Here is my workaround guideline as per toryb's comment.
1. Close Visual Studio.
2. Copy ODataClient.cs file from VS project folder to another place.
3. Do backup that file in your own way.
4. Open ODataClient.cs by your desired text editor.
5. Search and list with 'Edmx' keyword.
You will find that area of Edmx variable are between line 50,995th and 325,713th !!

6. Cut the XML part (start at <edmx:Edmx... and ...</edmx:Edmx> at the end) and paste to the new file.
7. In the new file, replace all "" (2 double quote) with " (single double quote) because they were generated incorrectly. This step will take some minutes.

8. Save edmx.xml file.
9. Back to ODataClient.cs file, put the file name as the value of Edmx variable like this.
private const string Edmx = @"edmx.xml";
10. Search by 'CreateXmlReader' keyword and create an additional overload of CreateXmlReader() that does not take any parameters as follows.
Before

After

11. Replace global::System.Xml.XmlReader reader = CreateXmlReader(Edmx);
with global::System.Xml.XmlReader reader = CreateXmlReader();

12. Save ODataClient.cs file.
13. Copy ODataClient.cs and Edmx.xml back to VS project folder.
14. Launch Visual Studio
15. Add Edmx.xml file into the project and update it's Build Action is "Content" and the Copy to Output Directory is set to "Copy if Newer" or "Copy Always". This will make sure the xml file is distributed with the library / application.

So now, rebuild the project again. And the result should be ok as follows.

 using AuthenticationUtility;
 using ODataUtility.Microsoft.Dynamics.DataEntities;
 using Microsoft.OData.Client;
 using System;
 using System.Collections.Generic;
 using System.Linq;
 using System.Text;
 using System.Threading.Tasks;
 namespace TestODataClient
 {
   class Program
   {
     public static string ODataEntityPath = ClientConfiguration.Default.UriString + "data";
     public static void CreateMyCar(Resources context)
     {
       string CarID = "CA0001";
       DateTime todayDateTime = new DateTime(2021, 01, 01, 0, 0, 0);
       DateTimeOffset todayDateTimeOffset = new DateTimeOffset(todayDateTime, new TimeSpan(+1, 0, 0));
       decimal amount = 499999.99m;
       try
       {
         MyCar MyCarEntity = new MyCar();
         DataServiceCollection<MyCar> MyCarCollection = new DataServiceCollection<MyCar>(context);
         MyCarCollection.Add(MyCarEntity);
         MyCarEntity.CarID     = CarID;
         MyCarEntity.BrandName   = "BMW";
         MyCarEntity.SerieName   = "X5";
         MyCarEntity.Color     = "Black";
         MyCarEntity.Price     = amount;
         MyCarEntity.PurchasedDate = todayDateTimeOffset;
         context.SaveChanges(SaveChangesOptions.PostOnlySetProperties | SaveChangesOptions.BatchWithSingleChangeset);
         Console.WriteLine(string.Format("My car record {0} - created !", CarID));
       }
       catch (DataServiceRequestException e)
       {
         Console.WriteLine(string.Format("My car record {0} - failed !", CarID));
       }
     }
     static void Main(string[] args)
     {
       Uri oDataUri = new Uri(ODataEntityPath, UriKind.Absolute);
       var context = new Resources(oDataUri);
       context.SendingRequest2 += new EventHandler<SendingRequest2EventArgs>(
         delegate (object sender, SendingRequest2EventArgs e)
         {
           var authenticationHeader = OAuthHelper.GetAuthenticationHeader();
           e.RequestMessage.SetHeader(OAuthHelper.OAuthHeader, authenticationHeader);
         });
       CreateMyCar(context);
       Console.ReadLine();
     }
   }
 }
Now, rebuild the project, run and if anything goes well, then get the following result.


Finally, check the table and OData in the browser and data should be populated in the table.
Finally, the data is inserted successfully from the external application into D365FO!
References:
Comments
Post a Comment